Tuesday, June 26, 2012

Tutorial - How to Make A Family Tree Art With Photos


Finally finished the Father's Day gift for Stubborn. We just recently had our second child, then Stubborn's dad passed away two days before Father's Day. We all thought he is finally free. He had a very bad stroke 5 years ago, and has been in coma ever since. Last year, we went back to visit him with little Caterpillar, we all thought he could hear us. Maybe he was not satisfied with a granddaughter, so secretly wished for a grandson. Anyway, we got preganant right after we came back, and had little JJ. Stubborn took JJ's picture back to him last month, and we Skyped a lot. Guess he was finally satisfied, with a grandson who can carry the family name, he just gave up. He passed away just 2 weeks after Stubborn came back. Anyway, this gave me a great idea for Father's Day gift. I made a family tree art for Stubborn's office, with photos of family members and names. He didn't say much, but I know he loves it.

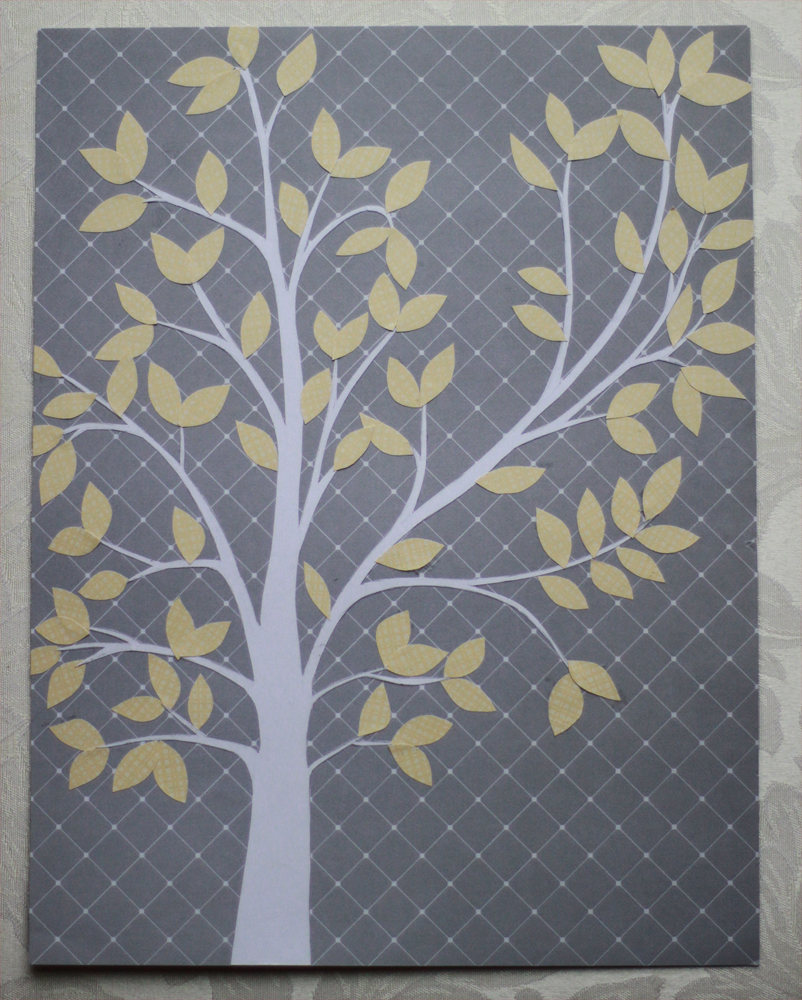
Here is how I did it. I looked around the web to find a tree shape that I liked, and drew it on the back of a piece of scrapebook paper. I liked the gray and yellow color theme of the inspiration picture, so I sticked with it. Forgot to take a picture before cutting the tree out, but you get the idea.

Cut out the tree and all the leaves with scissors or knife. You don't have to be exact with leaves, you are going to use the other side, so the pencil marks won't show. But with your tree, you should drew the branches thicker than they will be and cut inside the lines. And don't worry too much if you accidently break a branch, you are going to glue everything on a background paper, so it won't show. This is what left after cutting out the branches, I am going to use this for a scrapbook page, so it won't go to waste at all.

Glue the tree to the background paper of your choice, then place the leaves where you like.

Pick out portraits of family members and print them out. What I did was  copy paste the headshots into one picture, print and cut them out. I printed 12 (3 by 4) pictures on a 4 by 6 picture, you can size them base on the size of your finished art and how many family members you want to include.

Glue the headshots on another piece of scrapbook paper, cut them out, leaving some space of the bottom for names.

Glue the pictures to the tree. I put greatgrandpa, grandpa, daddy and JJ on the main trunk of the tree following that order, so that's the main stream of the family who carrys the family name from generation to generation. In our culture, only male family members got included in the family tree, but I wanted to include all the people Stubborn loves. So I included his great aunt, his aunt, and his mother's side of the family (on a side branch). Of course I have to include our little Caterpiller, she probably is the person he loves the most in this world.

Finally put everything together.

I just love to make these special gifts for my family. I framed antique lock pieces from Stubborn's grandma's wedding luggage, and made a photo collage of daddy daugher moments in the past. I refinished a table set for little Caterpillar's 2nd birthday, and have some great ideas for this year. Even though I don't say it out loud all the time, I do love this man and our little family.


Wednesday, June 6, 2012

Scrap Sewing Projects II


Isn't this baby cute? A whole dress costed me about $4! I went to Joann the other day looking for some velco tapes. Seeing their remnant shelves were so full, I just could not pass it by. I said here before that I would not buy new fabric until I use up most of my stash. But these two just were too cute. Look at them, it's like someone put them there on purpose. Sorry I forgot to take the before pic, the shirred fabric was already cut.

Look at these tiny owls! Aren't they the cutest thing ever? They are only about the size of a pea.

I knew there was only 1/4 yard of that green shirred fabric, but it was way smaller than I imagined. Lucky it's wide enough, and little caterpillar is still young. So, I cut it in half, it's the perfect height then. One side of the ruffle is longer than the other side, so I cut off the extra, and hem it again, so the two pieces became identical.

Here is the cut pieces. I was so lucky, had enough fabric for the dress, and barely enough for a hat brim. Look at the next picture, that's all it was left. Maybe enough to cover some buttons.  
 

Again, here is the finished dress. The way I designed it, it can be wore 3 different ways. I made it quite big, it was meant for next year. Little caterpillar already has more than 20 dresses this year.

When she is younger, the straps will be long enough to tie up right in front.

She can also tie a couple of knots in each strap and let the tips hanging freely. The knots will hold the straps in place, and can be tied at any length, so this dress is very versatile.

Since the front and back are exact same, she can also wear it as a Halter dress, tie the straps in the back. But that will be a couple of years from now. She pulls her other halter dress down to waist now. Not very safe.


What's the verdict? "It's very cute. I LOVE IT!" "It's too big mommy!" Oh, honey, I know. I love it too. I really paid attention to the details this time, as this is the first dress I made for her from scretch. I serged all raw edges, really put my new serger to good use this time.

I double stitched most of places.

I even added a little piece of ribbon to the side. Little caterpillar was very excited to find a hello kitty there. Stubborn even said it looks like store bought. Yay! Approval from both of them!

What's next? I am working on a reversable bucket hat with the tiny left over pieces, so little caterpillar can wear this dress with a matching hat. Will show you the hat when it's done. Just need to go to Joann again for some interfacing. Who knows, I might find more cute fabric.

Tuesday, June 5, 2012

Scrap Sewing Projets I


What to do when you have an extra sleeping bag or comforter, but no place to store it? Make a pillow out of it and put it in plain sight.

Stubborn just came back from China, and a family friend gave little JJ a sleeping bag. It's those very thick one meant for winter, but now is almost summer.

I could just put it into a box in the attic, but I was digging for some fabric scraps for another project, and found this already finished pillow cover. I made it for little JJ's crib, it was made from a piece of very small scrap. I didn't have time to make the pillow filling for it. Then it hit me. WHY DON'T I PUT THE SLEEPING BAG IN THIS?

Hey, it fits! Looks like I made this pillow cover just for it, isn't it? I got lucky there. 


And it fits in the Nautical theme perfectly! Do you see the lighthouse art on the wall, and the homemade boats mobile? There are more nautical decoration coming. This boyish sleeping corner in our pink master bedroom is almost complete. 

Monday, June 4, 2012

Little Piglet Turned Two Months

At 16 lbs, this little piglet almost doubled his birth weight in just two months. His weight and height now are about the same as little caterpillar's, when she was 6 month old. I must have done something right. Look at those rolls!

I actually started the monthly portrait project as planned. Just didn't have time to post it last month. So here are the two of them together. Sorry you cannot see his face, it's Stubborn's privacy rule. But aren't this fake sunglasses stylish?